¶ Introduction
The firmware source code is published under a Fair source license on our project Github page, where you can also download compiled binary code for many popular Espressif micro controllers.
While hobbyists are free to use the firmware on their own hardware, there is a use limitation of maximum 5 devices per user.
The cost of developing and maintaining the code is covered by our sale of hardware from our webshop https://amsleser.no.
¶ Bug reports, improvement suggestions
We strongly encourage users to report bugs and other issues in the Issues section of the project Github.
Your ideas to improve the functionality are also welcome!
¶ Purpose and scope of the manual
This wiki manual gives:
- Basic steps to get a new device up and running
- In-depth information on how to set up and use the more advanced features and functions
¶ Hardware overview and compatibility
¶ Hardware overview
Please see the user manuals for each device:
The firmware is primarily designed to run on hardware developed and sold from our webshop https://amsleser.no. Our designs are currently based on the Espressif ESP32-S2 micro controller with 4 MB flash memory. Previous models were based on the Espressif ESP8266 micro controller.
¶ User hardware
The firmware can also be configured to run on user hardware by selecting a “generic” hardware profile during setup - and assigning GPIOs on the Configuration screen.
¶ Device Overview
¶ Physical setup and connections
The firmware connects to the following peripherals:

When using the firmware with our devices Pow-K, Pow-U and Pow-P1, the hardware profile is predefined, so the micro controller knows how to address the peripherals.
If the firmware is run on user hardware, GPIO allocation is done by selecting a “Generic” hardware profile, which allows allocation of GPIOs on the configuration screen.
¶ Getting Started
¶ Quick setup guide for new devices
See this wiki page.
¶ Detailed initial setup instructions
Before starting, please consult the device User Manual to get familiar with the user buttons for your device.
¶ Restart / reboot
- Pow-U/Pow-P1: Press the RES button on top lid.
- Pow-K: Remove the device from the power meter, press the RESET button available at the back of the board (or just wait 15 seconds for the board to run out of power. The board will work for a short period, powered by the supercapacitor.) Then re-insert the device in the power meter.
In both cases, reboot is confirmed by a short green/yellow/green blink sequence on the RGB LED.
¶ Access point mode
- Pow-U and Pow-P1 need external power on the USB port during Access point mode. Failing to do so could result in non-functional device that will need re-flashing.
- Pow-K can be in Access point mode while the device is seated in the power meter.
Press and hold the "AP" button until the LED is steady yellow (white on Pow-U and Pow-P1). A factory new device should enter this mode directly after power-up.
¶ Connection to User Wi-Fi
- Activate "Access point mode" as indicated above. This is confirmed by steady yellow on the LED (white on Pow-U and Pow-P1). A factory new device should enter this mode directly after power-up.
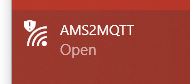
- The Device will now set up the Wi-Fi access point AMS2MQTT (with no password). Connect your PC, pad or mobile phone to it.
- Open this IP-address in a browser: http://192.168.4.1/
- The Setup page for connecting the device to your Wi-Fi will be displayed:
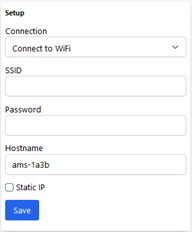
- Connection
Select "Connect to WiFi" for a normal setup; most users will use this. Select "Standalone access point" if there is no WiFi on site, and user wants to connect to the device, for instance a cottage ("hytte" / “sommerstuga” / “landsted”) without WiFi. - SSID
The detected SSIDs will be shown when you activate this field. Select the preferred Wi-Fi access point.
Note: Must be a 2,4 GHz access point (not 5 GHz) - PSK
Enter the password for the selected SSID. - Hostname
You can replace the proposed default to something that is easier to remember. The hostname can later be changed on the configuration page.
Depending on your Wi-Fi router:- 1) Hostname is registered in your router DNS service. Device can then be reached on http://hostname.
- 2) If your router supports mDNS, the Device can be reached on http://hostname.local.
- Static IP is recommended, as it will speed up the connection to Wi-Fi.
¶ Static IP
An alternative to setting Static IP at initial configuration:
- Proceed with DHCP (your router will assign an available IP)
- When device has rebooted (no longer in Access point mode), consult the Status/Info page, and note the IP address the device is assigned.
- Go to the Configuration page and configure Static IP on the assigned IP address
Parameters for configuring static IP:
- IP
Enter an unused IP address on your network (consult router user panel). - Subnet
The "/24" indication means Subnet 255.255.255.0 – which is correct for most users.
(Those that need a different setting will surely know what to select!) - Gateway
This is your router IP address. (Run "ipconfig" from a PC command window; look for "Default Gateway") - DNS
1.1.1.1 is a publicly available DNS server. Use this if in doubt. You can often also use the IP address of your router.
Press “Save”. The Device will restart, connecting it to your router. The AMS2MQTT access point will no longer be available.
¶ First startup after connecting to Wi-Fi
Reconnect your PC/pad/mobile phone to your router and connect to the Device using its IP address or mDNS Hostname. In most cases, this will be automatic; just wait for the browser window to reconnect.
If your device is new, you will be asked whether you accept some data collection that is needed to enable one-click firmware upgrade of your device. This can later be changed from the Status/Info page:
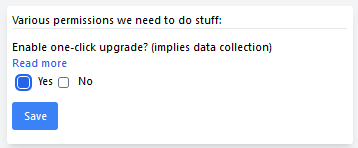
Select and click Save. The main screen will then open, initially without data:
If your device is a Pow-U or Pow-P1, you can now remove the external power and connect the device to your meter using the appropriate cable.
After a few payloads, the device should auto-discover the baud rate and parity used by your meter and display some data on the main screen.
You can now proceed with remaining configuration.
¶ Configuration screen
Access the configuration screen by clicking the gear icon in the upper right corner.
¶ Action buttons on the bottom of the page
There are three buttons:

- Factory reset: Resets settings to factory default and erases stored consumption records. It's a good idea to make a backup of the settings (Information / Backup & restore) first, to save current configuration. After a Factory Reset, the device will go into access point mode (indicated by yellow LED). The device will be in the same state as when you received it, so you will need to give it access information to your Wi-Fi router again.
- Reboot: Reboots the device. If settings have been changed, make sure to click the blue Save button first.
- Save: Use this button after making parameter changes. It saves configuration and returns to main page (and reboots if needed, depending on the change).
¶ General
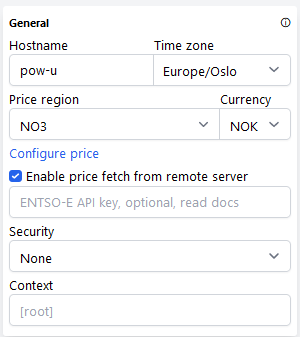
- Hostname: Set an easy-to-remember name that can be used in the URL.
- Time zone: Select from drop-down list.
- Price region: Select your region from drop-down list. If your country is missing, please write a request issue on the project GitHub page. Only countries that are members of Entso-E can be covered. This is mainly European countries, but Turkey and Morocco are also members.
- Currency: Select desired energy price currency from drop-down list.
- Configure price: See below.
- Enable: Activate "Enable price fetch from remote server" to fetch and display current and future energy prices. Prices are retrieved from our server at amsleser.no, which provides a continuously updated feed based on ENTSO-E data. No API key or account with Entso-E is required.
- Security: This is used for password protection of your device. Select from the dropdown list if you want protection of everything, or only the configuration page.
- Context: If you have secured your device behind a web proxy and set a path for it, set this here as well.
Example: If you proxy from https://mydomain.tld/amsreader, you should set "amsreader" as context.
¶ Configure price (Price modifiers)
Price modifiers example, modifiers are applied in the order they are listed. Order can be changed by using the arrows on the right-hand side.
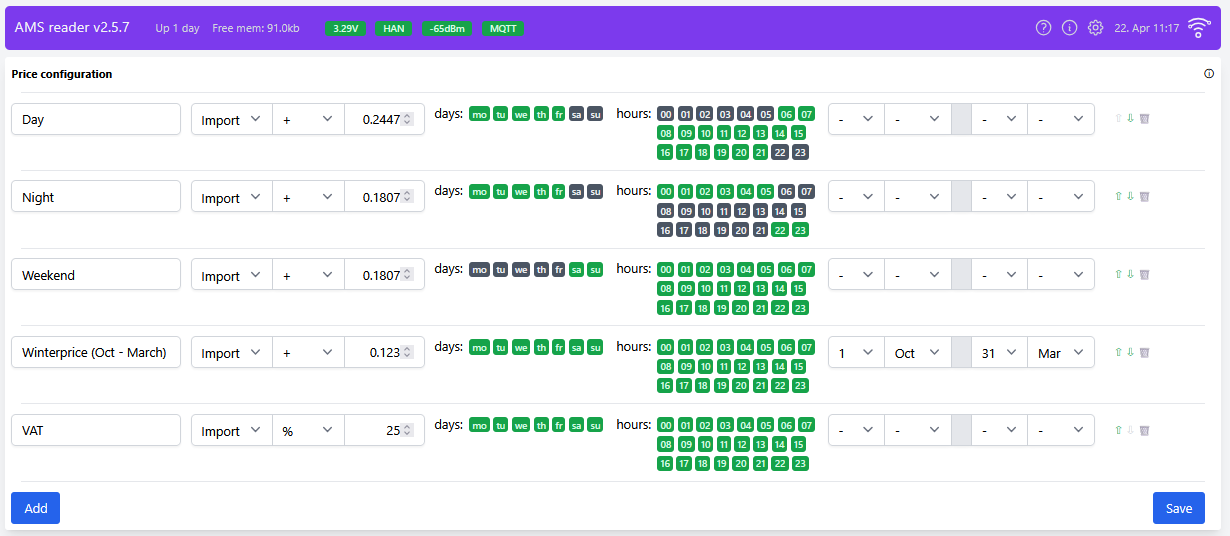
The price configuration gives an option to configure price modifiers that modify the published spot price to fit with the contract you have with your energy supplier, regarding import (consumption) or export (production). Defined modifiers are applied in the order they are configured/listed, and can be configured with restrictions on:
- Direction (import/export)
- Day(s) of the week
- Hour(s) of the day(s)
- Date range (from and to)
Enter a suitable name in the first field, then:
¶ Import/export selection
"Import" is power you buy (normal consumption).
"Export" is power you deliver to the grid, from solar panels, wind turbine etc. Note that this is not your power production, but what is exported to the grid.
- Import - Only applied to import power (consumed)
- Export - Only applied to export power (produced)
- Both - Will be applied to both import and export
¶ Operations that can be selected
- Fixed: A fixed price that will override the published price
- + (Addition to price) : Will be added on top of the current price
- - (Deduction from price) : Will be subtracted from the current price
- % : Will add a percentage on top of the price. Useful for adding VAT/moms
The above examples should be useful to understand how to use this feature. When hours or days are green, they are selected.
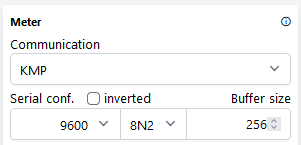
¶ Meter
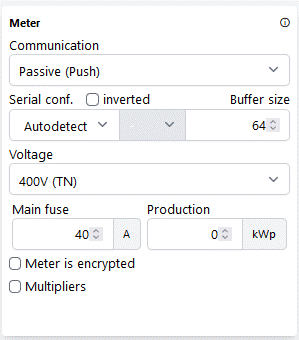
- Communication: Should in most cases bstay on "Passive (push)". (
- KMP: Used on Kamstrup 382M (not Omnipower)
- Pulse: Experimental feature, used when reading data from meters that deliver pulses - Serial conf.: Baud rate and parity should be auto detected, so you should normally not touch these settings.
- Buffer size: Size of the payload read buffer. Increase it if you see payload error messages.
- Voltage: Select the voltage of your installation: 230 or 400V. If you are uncertain, read all the small text on the front of your power meter. If 400V is at all mentioned, your system is 400V.
- Main fuse: Enter the value of your main fuse. This is used only for scaling the current graphic.
- Production: If you have solar panels, wind turbine or other energy production: Enter peak power potential from your production installation.
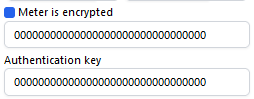
- Meter is encrypted: If your meter is encrypted: Activate encryption and enter the two encryption keys (often called GPK60/61) provided by your grid company.
Note: If your meter is encrypted, your grid company should provide encryption keys when you request activation of the HAN port. Some meters brands can be configured for more than one encryption format. You must request encryption keys in double-key format (GPK60/61, also called DLMS/COSEM): Encryption key + Authentication key.
Enter the keys in the two fields, be careful to copy them correctly!
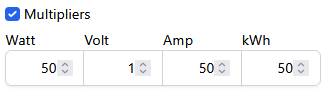
- Multipliers: The multipliers can be used if the data coming from the meter need correction.
Typical cases are:- There are some known cases of meters that report an extra digit on some parameters, so that they display wrong values by a factor ten. Use multipliers to correct this.
Example: If the displayed current reading is 10 times too high, enter 0.1 as current multiplier. - Some larger ("industrial") installations have Current transformers installed.
To display correct values on such installations, multipliers must be applied. Consult your grid company if the readings you see in the amsleser user interface are incorrect, they will know the multiplication factor needed.
Example
If your installation has Current transformers with a factor 50, you will without setting Multipliers read only 2% of the correct values for Watt, Amp and kWh.
The correct multiplier settings will then be:
- There are some known cases of meters that report an extra digit on some parameters, so that they display wrong values by a factor ten. Use multipliers to correct this.
¶ If your power meter is Kamstrup 382M
Select
- Communication: KMP
- Baudrate: 9600
- Parity: 8N2
- Buffer size: 256
¶ Connection
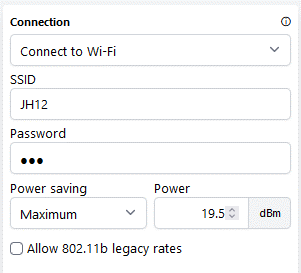
This section is used if you need to change the Wi-Fi SSID.
- Connection: Select "Connect to WiFi" for a normal setup. Most users will use this. Select "Standalone access point" if there is no WiFi on site, and user wants to connect to the device (for instance a cabin without WiFi). Probably very limited number of use cases. NOTE: Pow-U units must in this case be powered via USB cable.
- SSID/Password: Select the SSID and enter its password.
- Power saving: Recommended setting:
- Pow-P1: Off
- Pow-K: Minimum
- Pow-U: This is the tricky one; default value is Maximum. If the user interface feels too little responsive, you may want to adjust the setting to Minimum and monitor the device to see if it is able to stay online (not lose voltage). If OK: Stay on Minimum.
Additional information: https://amsleser.no/blog/post/25-pow-u-and-power-saving - Power: The ESP module radio transmission power can be adjusted. (This is an "experimental feature", the default value should be fine.)
- 802.11b legacy rates: Wi-Fi standard 802.11b is an old standard, not needed by newer Wi-Fi routers. Enable it only if you have a very old router and experience issues.
¶ Network
This section is used for setting Static IP and NTP server. Default setting is DHCP (not Static), which is normally fine. Advanced users may want to make adjustments.
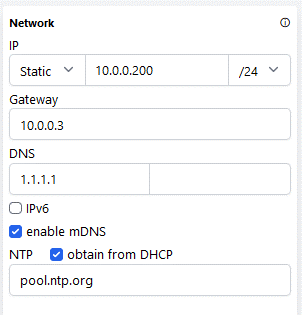
Setting static IP address is explained here.
¶ MQTT
This section provides instructions on enabling and configuring a connection to an MQTT broker.
¶ Configuration

- Server: You can use either an internal (local IP address) or external (cloud-based/hostname) MQTT broker.
Please note:- Most users will insert the IP address of the device in their network (often a Raspberry Pi) that runs their MQTT broker. The standard port number is 1883.
- If you enter a domain name instead of an IP address in the Server field, a DNS server is required in the Wi-Fi configuration if a static IP is used.
- SSL is verified against the domain name of the server. Therefore, it’s crucial that the domain name in Host matches the name used in the SSL certificate. Please follow your MQTT broker’s guidelines carefully.
- SSL requires the clock to be synchronized. If the clock in your device is incorrect, please adjust the NTP configuration.
- SSL does not work on ESP8266 based devices due to its limitations.
- User/password: Use this if the MQTT broker requires password protection.
- Client ID: This is how your device identifies itself to the MQTT broker. It can be freely chosen but must be unique among units connected to the same broker.
- Payload: Select your desired payload format from the dropdown list.
- Publish topic: Enter the desired MQTT Publish topic.
- Subscribe topic: A topic to listen for commands. Will be
/commandif nothing is configured - Update method:
- Real time: All payloads are sent on MQTT as they arrive from the meter.
- Interval: Allows selecting the time interval (seconds) to reduce the amount of data points in the receiving database - Timeout: Time (seconds) the client waits for an operation to complete
- Keep-alive: Maximum time (seconds) between messages sent or received by the client
- Auto-reboot: The device reboots if it cannot connect to the MQTT broker for the configured number of minutes.
¶ Commands that can be sent to the subscribe topic
- fwupgrade - Will trigger a firmware upgrade if a new version is available
- dayplot - Returns a JSON containing day plot data
- monthplot - Returns a JSON containing month plot data
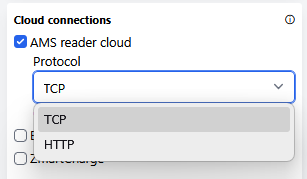
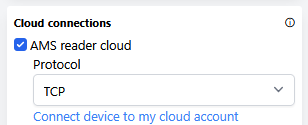
¶ Cloud connections
¶ AMS reader cloud
By activating AMS reader cloud the device will send data to our web server which can show a web page that mimics the main page in the user interface. This will allow you to access your user data from any internet-connected browser. Access to the service requires user create an account and log in. Using the service is for the moment free of charge.
How to use the service:
- Activate AMS reader cloud on the configuration screen
- Select protocol: In most cases the default “TCP” is fine. If connection is unstable, try “HTTP”
- Press the blue Save button (bottom right).
When you Return to the configuration screen, a link Connect device to my cloud account is shown. Click it.
- A new browser tab will open
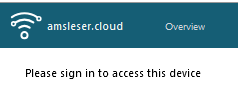
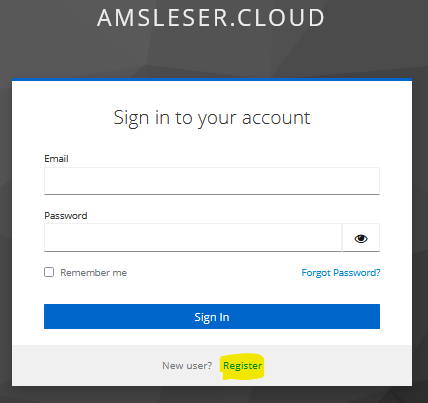
- Click “Sign in” (upper right)

- If you are a new user, create an account by clicking “Register”, then sign in.
- If you are returning to the cloud service you might need to click “Overview” to open the main page.
- On first login after device is tied to Cloud service, you will be prompted to give the device a name. This is especially useful if you want to connect to several readers with your account (home + hytte/sommarstuga/cabin etc). This one is named Pow-K at home:
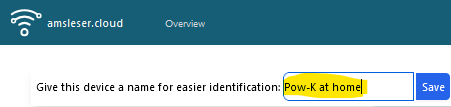
- Click Save.
- A page similar to the ordinary main page is shown, but initially without historical data, as the history will be built up separately on the web server.
Energy speedometer
By activating Energy Speedometer a QR code is displayed that will enable sending data to an Energy Speedometer.
Activation of this options sends data to a third party web server that Utilitech AS / amsleser.no do not have access to, and is not responsible for. Before activating, user must consider and decide whether data safety is sufficiently preserved.
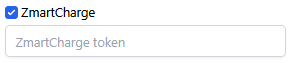
¶ Zmartcharge
Used to activate the load balancing feature on a Zmartcharge EV charger. When activated, you'll be prompted to enter your Zmartcharge token:
Activation of this options sends data to a third party web server that Utilitech AS / amsleser.no do not have access to, and is not responsible for. Before activating, user must consider and decide whether data safety is sufficiently preserved.
¶ Notes
There are no affiliation or links between Utilitech AS / amsleser.no and the companies selling the Energy Speedometer or the Zmartcharge EV charger. Any inquiries or questions regarding those devices must be directed to those companies.
¶ Tariff thresholds
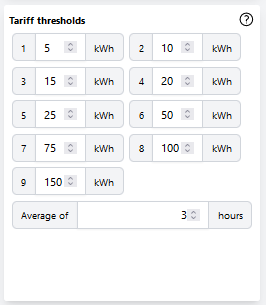
This section is specifically for Norwegian (and some Swedish) users, to support the “Peak power” fee introduced in Norway in 2022 as part of the grid fee. This configuration section will therefore only be visible if a Norwegian or Swedish price region is selected in the “General” section.
If your consumption exceeds a certain threshold, a penalty fee will be added to your next monthly bill. If you also surpass the next threshold, the fee will increase – and so on.
In Norway, the value that is compared with the threshold levels is defined as the average of the highest hour-interval consumption on three different days of a calendar month.
The threshold levels vary between grid companies, so you need to consult the web page of your grid operator and adjust the levels if needed.
See here for an example that shows how to interpret the graph that results from activating this functionality.
¶ User interface
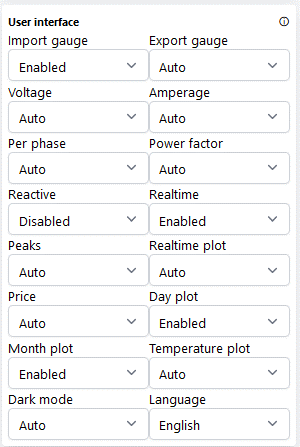
This section allows you to customize which sections are displayed on the main page. This is particularly useful if you want to simplify the display for daily use.
From the pull-down menus, select Disabled, Enabled, or Auto. The Auto option means that a section will be displayed if such data is available.
Please note that there is no temperature sensor on Pow-U, Pow-K, or Pow-P1 devices. You can install temperature sensor yourself on newer versions of Pow-K and Pow-P1 that are in sale from end 2023. See the device User manuals.
¶ Dark mode
Browser Dark mode is implemented, with the following options:
- Disabled: always light mode
- Enabled: always dark mode
- Auto: follows the operating system/browser
¶ Language
The firmware supports changing the user interface language.
If your language is not on the list of languages, you can make a new translation and submit it for review: https://localazy.com/p/amsleser
To change user interface language:
- Select "Load from server"
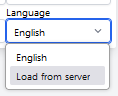
- Open the menu again, the available languages have now appeared:
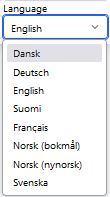
- Select the language you want to use, and press the Save button (bottom right)
¶ Hardware
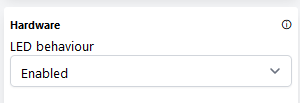
On newer devices the LED can be disabled.
Useful for situations where the power meter is exposed, so that the blinking is disturbing.
¶ Debugging
Activate this feature if you encounter an issue that requires in-depth investigation.
For instructions on how to use it, visit https://amsleser.no/blog/post/24-telnet-debug
Remember to turn off debugging when you are done using it.
¶ Status/information screen
Access the Status/Information screen by clicking the ⓘ-symbol in the upper right corner.
¶ Header status information
The header bar continuously displays:
- Device uptime
- If temp sensor is installed: Temperature in °C
- Free heap memory in kb
¶ Header error indicators
A red error banner is displayed in the header bar in case of:
- HAN port error <error code>
- MQTT error <error code>
- Price service error <error code>
¶ Device information
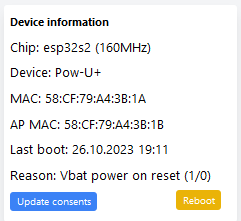
- Chip: Identifies the microcontroller.
- Device: Identifies your specific Pow-K/U/P1 device type.
- MAC: Displays the MAC address of the device during normal operation.
- AP MAC: Shows the MAC address of the device when in Access Point (AP) mode.
- Last boot: Displays the time of the last reboot.
- Reason: Shows the identified reason for the last reboot.
By clicking "Update consents", you can activate or revoke the permission to use one-click firmware upgrade of the device (during which some data is collected).
Pressing the “Reboot” button will reboot the device.
¶ Meter
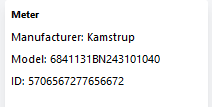
This section displays the brand, model, and ID number of your energy meter. Most (but not all) power meters send this information on the HAN port.
¶ Network
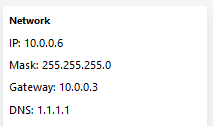
- IP: Displays the IP address of the device.
- Mask: Shows the subnet mask. The commonly used network mask 255.255.255.0 corresponds to the “/24” setting on Configuration/Network.
- Gateway: Displays the IP address of the gateway (access point / “Wi-Fi router”) your device is connected to.
- DNS: Shows the currently used DNS servers.
¶ Firmware
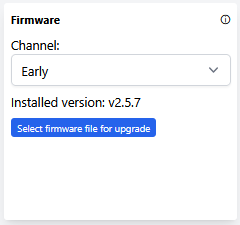
Displays the currently installed firmware version, and gives the option of selecting Firmware release channel.
¶ Firmware release channel
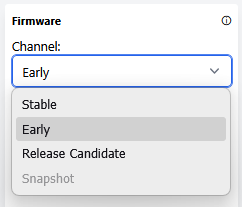
User can select to receive download invite for less mature firmware releases:
| Channel name | Description |
|---|---|
| Stable | Recommended production releases (default) |
| Early | Early access builds |
| Release Candidate | Release candidates (near-final pre-release versions) |
| Snapshot | Development snapshots (Not activated) |
Download invites will be shown as an orange link in the purple header bar. Click the link to start the download/install process.
¶ Manual firmware upload
Click the blue button Select firmware file for upload to manually upload a firmware binary file.
All firmware releases including release notes, are available here: https://github.com/UtilitechAS/amsreader-firmware/releases
NOTES
- Use the right firmware for your processor - or the unit will become unresponsive and require reprogramming by cable.
- Pow-U must be powered from Micro-USB during this procedure, or the unit could become unresponsive and require reprogramming by cable. Other devices can be manually upgraded while powered from the meter.
- The following devices can be reprogrammed over USB cable:
- Pow-P1, all versions
- Pow-U layout versions v1.6 and later (layout version is printed on the circuit board)
- Pow-K+ layout version v1.5 and later (layout version is printed on the circuit board)
¶ Backup & restore
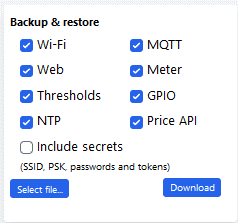
Use this to make and restore backups of the current configuration to/from a text file. This can be useful before installing “experimental” firmware versions, and a safety before upgrades.
You can select which part of the configuration is downloaded or uploaded.
The “Download” button is used for downloading backup of configuration from the device to a text file.
The “Select file” button is used for restoring configuration from a text file to the device.
¶ The Main Screen
¶ Status bar

- Device voltage
Displays the device operating voltage. Green light indicates correct voltage. If yellow or red, voltage is low.- For Pow-K and Pow-P1, the light should always be green.
- For Pow-U, a low voltage (yellow) is relatively common, especially if the GUI is heavily used. Close GUI windows that are not in use. A red light indicates that the device is close to a low-power reset. The device will be unresponsive while recharging from a low-power reset.
- HAN
Green light indicates that the latest payloads from the HAN-port are read without error. If packages arrive that are rejected, the light will first turn yellow, then red. - Wi-Fi RSSI
Shows Received Signal Strength Indication (RSSI) between Wi-Fi router and device. Yellow indicates low RSSI (weak Wi-Fi signal). Red indicates a very weak signal. Yellow level will usually work fine. If the signal is too weak, consider installing an access point (Wi-Fi extender or dedicated Wi-Fi router) close to the device. - MQTT
Colour codes:- Green
MQTT is activated, and the device is connected to an MQTT broker. - Red
MQTT is activated but device cannot connect to the configured MQTT broker. (Check configuration settings!) - Grey
MQTT is not activated. - Yellow
Could potentially sometimes be seen during connection to MQTT broker.
- Green
If a new firmware version is released, there will be a reminder in the top bar:

Users who have accepted one-click upgrade can click on the message to initiate the upgrade.
We recommend using the latest published firmware version.
¶ Gauges
¶ Import gauge
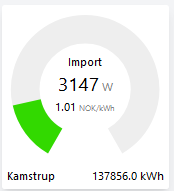
This gauge displays the following information:
- Imported power in Watt
- Energy price (right now) in your selected currency per kWh
- Power meter brand
- Estimate of total accumulated imported energy on the meter since it was installed [kWh]
The graphical indicator is scaled based on the setting in Configuration/Meter/Main fuse. Additional information on the estimated accumulated value.
¶ Export gauge
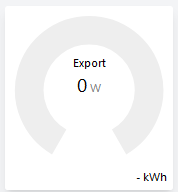
This gauge shows:
- Exported power in Watt
- Total accumulated exported energy on the meter since it was installed [kWh]
¶ Voltage gauge
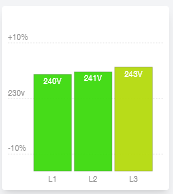
Depending on the installation, the graph shows:
- 400V system: Voltage on each phase relative to Neutral
- 230V system: Voltage between each phase pair
The colour will change from green to yellow/orange/red if voltage deviates from the nominal 230V voltage.
¶ Current gauge
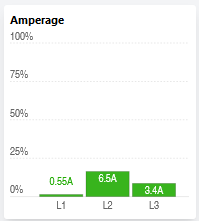
This gauge shows the reported current per phase. The graphical presentation is scaled according to the setting of Configuration/Meter/Main fuse.
Some power meters do not report current on L2.
¶ Real time calculations
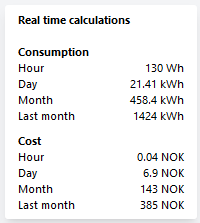
This section displays continuously updated counters for:
- Energy use for the ongoing hour
- Energy use for the ongoing day (24-hour period)
- Energy use for the ongoing calendar month
- Estimated energy cost for the ongoing hour
- Estimated energy cost for the ongoing day (24-hour period)
- Estimated energy cost for the ongoing calendar month
If the installation is configured for production (solar panels, wind turbine etc.), a “Production” section will be shown.
Additional information on the estimated accumulated.
¶ Tariff peaks
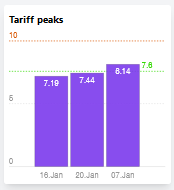
This graph shows the current status on the Norwegian “Peak power” fee. It is only visible if a Norwegian or Swedish price region is selected in the Configuration / General section.
The status shown in above illustration means:
- The current Peak Power average is 7.8 kW, and is the average of the highest-hour peak consumption on the dates 16th, 20th and 7th January.
- The next "penalty level" (where a higher penalty fee would be applied) is 10 kW (indicated by red line)
¶ Real-time plot

This plots instantaneous power import / export over the last 60 minutes.
The graph goes negative if there is excess power produced from solar panels etc, meaning the displayed power is exported to the grid.
¶ Future energy price

This section displays hour by hour future energy prices based on settings in Configuration/General.
The leftmost bar is always the current price ("now"). Prices for next 24-hour period is published between 13 and 14h (CET), and will then be added to the graph.
Graph data are (mostly) provided by https://transparency.entsoe.eu/
¶ Energy use latest 24 hours

This section displays energy use [kWh] per clock hour over the last 24-hour interval. There is no bar for the ongoing hour, the rightmost bar shows the previous whole hour.
Example: The bar denoted 15 is the consumption from 15:00:00 to 15:59:59.
The graph goes negative if there is excess energy produced from solar panels etc, meaning the displayed energy is exported to the grid.
Note that historical data can be edited by clicking Edit data (to correct known errors that may occur in failure situations).
¶ Energy use latest month

This section displays energy use per day/date (24-hour period) during last month. There is no bar for the ongoing date, the rightmost bar shows yesterday’s consumption.
The graph goes negative if there is excess energy produced from solar panels etc, meaning the displayed energy is exported to the grid.
Note that historical data can be edited by clicking Edit data (to correct known errors that may occur in failure situations).
¶ Estimation of total accumulated energy
Some power meters (in particular those configured as “HAN-NVE”) report total accumulated energy only once per hour, read at xx:00:00, sent to the HAN port at approximately xx:00:05.
The Realtime kWh-indicator shown in the Power gauge and the Real time calculation tile is an estimate intended to mimic the value shown on the LCD screen of the power meter.
It is estimated by integrating the power as follows:
- Read and store value read from meter at whole hour
- For each accepted payload received from meter, Power*time is added to Accumulated energy.
- The value is reset at each whole hour when updated accumulated energy is reported by the meter.
Please note:
- If the device experiences numerous HAN read errors, the estimate will become increasingly inaccurate as time since last accumulated value read increases.
- After a reboot, the accumulation calculation will be reset, and the indicated value will be wrong until next whole hour has passed.
¶ Troubleshooting
¶ Common issues and solutions
If you experience issues, please consult the Tips & tricks section of our web page before reporting issues.
¶ Emergency factory reset
The firmware includes an option to recover from a lockout (e.g., forgotten password) from an otherwise operational device by performing an Emergency Factory Reset.
After a factory reset, all settings will be lost.
The procedure is:
- REBOOT the device
- On Pow-K: Pull the device from the meter, and power it through the USB socket. Press the RESET button.
- On Pow-U and Pow-P1: Press the RESET button (let it sit connected to / powered from the power meter).
- When the device boots, it starts with a short period of green steady light. Press the AP button while the LED is green, then release it when the LED turns red.
The factory reset is confirmed by a short sequence of rapid red blinks. - Press the RESET button.
- The device will now restart in Access Point mode.
Proceed with configuration. - If the AP button is not released while the LED is red there will be no factory reset, just a normal reset.
If this happens: Try again!
An alternative description of the procedure can be found in this article.
¶ Error codes on the LED
Certain errors will be indicated on the device LED.
Error codes are indicated with one code each 5 seconds (approximately). If two error codes are active at the same time, error code 1 will be shown, then after 5 seconds error code 2, then code 1 and so on.
- One flash: Not reading valid data from power meter
- Two flashes: No contact with specified MQTT broker
- Three flashes: No contact with specified Wi-Fi access point
¶ Additional resources and support
- See Tips&tricks on our web site.
- We have an active community on the project Github. Before reporting issues, please check the Issues section first.