This section provides a brief instruction for getting started with your new device.
- First of all: The HAN (Home Area Network) port is usually not activated by default on most smart energy meters. So contact your grid company and request activation. Many grid companies will let you do this online by logging in to “My page” on their website. (Activation is not necessary for Kamstrup 382M, used mainly on Southern Jutland in Denmark.)
- Next: Get familiar with your new unit by reading the relevant article:
- Pow-K: Plug your device into the meter or power it via the USB socket.
Pow-U / Pow-P1: Power your device via the USB socket. - The device needs a minute or so to charge. It will then boot, signaled by a green/yellow/green blink sequence on the LED.
- The device has now started up in Access Point Mode, with the LED steady yellow (white on Pow-U and Pow-P1). (Some additional red blinks after a while is normal.)
- Locate and connect to the access point AMS2MQTT on your PC or device (no password required). An “access point” is what many refer to as a “Wi-Fi network”.
- Important: Your Wi-Fi router must have 2,4 GHz activated. All Wi-Fi routers have 2,4 GHz, but modern routers are often dual band (can use both 2,4 GHz and 5 GHz). On such routers each of the bands can be deactivated.
- Open an internet browser window on your PC or device and open this IP-address: http://192.168.4.1/
You will see the Wi-Fi setup screen:
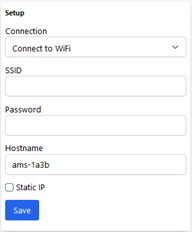
- Selections:
a. Connection: You will normally keep the pre-selected "Connect to WiFi"
b. SSID: Select the Wi-Fi network you want the device to use
c. Password: Your password for the selected SSID
d. Hostname: You may change the default name to one that is easier to remember, like amsleser.
e. Optionally, you can select “Static IP” (recommended) and enter credentials according to your network configuration.
Do not leave DNS empty; if you are uncertain, use “1.1.1.1”. (The field “/24” means Subnet 255.255.255.0 which is the normal setting.)
f. Press “Save” and wait for the device to restart. - After rebooting, you’ll first need to verify if you want one-click upgrade activated (implies accepting some data collection). We recommend confirming, it simplifies future upgrading.
- The device can now be connected to the power meter, and after receiving a few payloads, should have automatically detected baud rate and parity and display data on the main screen.
- Open the configuration screen by clicking on the gear symbol (top right):
a. In the “Meter” tile: Select the voltage used in your installation. Examine the text on front of your power meter - if 400V is mentioned, your system is 400V.
b. Enter the size of your main fuse (used to scale graphs).
c. If you have solar cells, a wind turbine, or other energy-producing installation, enter its maximum power output (kWp).
d. In the “General” tile: Select your price zone and the price currency you want to use. If you are in Norway, price zones with suffix “with support” means “med strømstøtte”.
e. Press “Save” (bottom right) to save the changes and return to the main screen.
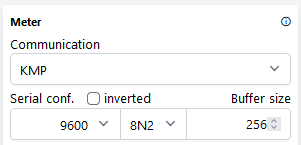
¶ If your power meter is Kamstrup 382M
On the config screen, in the Meter tile, select KMP, baudrate 9600, parity 8N2: