Your Pow-device will regularly indicate when a new firmware version is available. We always recommend running the latest version.
There are four methods available to upgrade your firmware:
- One-click upgrade (over Wi-Fi)
- Manual upgrade (over Wi-Fi)
- USB upgrade
- Reflashing using esptool
¶ One-Click upgrade
Most users can upgrade without issues using the “one-click” method. Simply click the link that appears on the top bar when an upgrade is available.
This could potentially fail due to network delays between the server and your device.
If it fails: Try again.
If it still fails: Revert to Manual upgrade
¶ Manual upgrade
- Download the binary file (*.bin) for your microcontroller version from the Release section on GitHub. It could also be a file from a test release you either find on your Github or receive from us by email.
Our devices use the ESP32-S2 microcontroller. Make sure you select the correct file, the file name shall contain “-esp32s2-”.
Note: The very first units we sold used the ESP8266 microcontroller. So if your board is really old, you need the binary file that contains “-esp8266-” in the file name.
Use that file for upgrade if your board layout version is- Pow-K: 1.4 or older
- Pow-U: 1.5 or oder
- Go to the status/info page, click “Select firmware file for upgrade,” and follow the instructions.
If your device for some reason is totally blocked, so that you do not have access to the user interface, you can use the USB upgrade method.
¶ USB upgrade
Note 1: Upgrade over USB is not possible with old Pow-devices using an ESP8266 microcontroller.
Note 2: This method works only from browsers that supports Web Serial API, which for the moment is: Chrome, Edge and Opera.
1. Backup Settings: Go to the Status/Info page and use the Download button.
2. Open Flasher Tool: Open this page in a Chrome, Edge or Opera browser window: https://www.amsleser.cloud/flasher
3. Connect Device:
- Connect a USB cable between your computer and the Pow device
- Click the green “Connect” button. An empty window should open.
- On your Pow device: Press and hold AP, press/release RES, release AP.
- The port of the ESP should now show up like this:
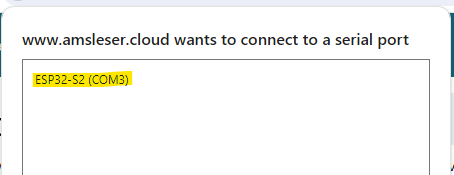
- Select it and press the blue “Connect” button.
4. Select Firmware: Choose the firmware version to install.
- You can now select which firmware version you want to install:
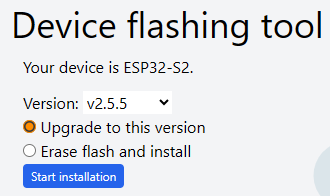
- Select the firmware version you want to use, and select either “Upgrade” or “Erase flash and install”, depending on your situation.
- NOTE:
“Erase flash and install” will delete all configuration and data stored on the device. When device reboots, the LED will not be active until you have reconfigured it according to point 7 below.
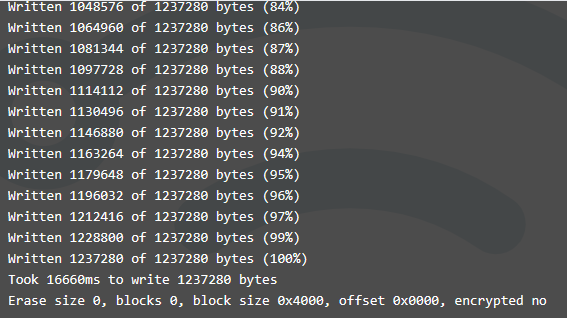
5. Program device: Press Start installation
- You should now see the upload process running in the output window:
6. Restart Device: Press the RES button on your Pow device.
If the LED does a startup sequence, you're finished.
If not, continue:
7. Reconfigure device if needed:
If the LED shows no activity, the device has forgotten its factory configuration.
- The device will in this case create the access point AMS2MQTT. Search for it amongst your Wi-Fi networks, and connect your PC, phone or pad to it.
- Open http://192.168.4.1/ and configure the device, including connection credentials to your Wi-Fi network.
8. Restore Settings: If needed, restore your settings from the backup file you made in the start using the “Select file…” button on the Status/Info page.
Congratulations, you have now upgraded your device over USB cable!
¶ Reflashing using Esptool
This is the most cumbersome method, used if all other method fails.
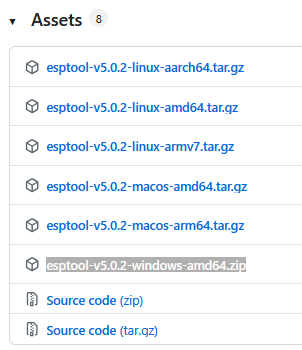
You must first download and install esptool from its Github repository. Install the latest version and select from the list of assets the one that is right for your computer. Windows users shall select the file ending with <…>windows-amd64.zip.
Unzip the ZIP file to a suitable directory on your computer.
Next: Download the binary files for flashing the device. Use the latest release from our Github: https://github.com/UtilitechAS/amsreader-firmware/releases and download the appropriate ZIP file. For newer Pow-devices that use ESP32-S2, select the file ms2mqtt-esp32s2-x.x.x.zip. Unzip the content to the same directory as previously downloaded esptool.
- Open a command window (Windows computer: <Win>+R, write “cmd”, press Enter).
- Navigate to the directory where binaries and esptool are located:
cd <directory path> - You might need to change to the right disk name, for instance using the command
g:if the folder is located on an other disk than c:\ - Connect your device to the computer that will run the flashing by connecting a USB cable. The cable will both power the device and provide the data transfer channel.
- Set the device into programming mode by:
- Press and hold AP button
- Press and release Reset button
- Release AP button - Open Device Manager to find out which COM port was activated: Right-click Start button (or press Windows key + X), then select "Device Manager" from the menu. Then expand “Ports (COM & LPT)” and note the COM port.
- Start by erasing the device, running this command in the command window. Replace “<port>” by the opened COM port, for instance “COM3”:
esptool --port <port> erase_flash - Wait for it to finish, then…
- Run this command in the command window. Replace “<port>” by the opened COM port, for instance “COM3”:
esptool --chip esp32s2 --port <port> --baud 460800 --before default_reset --after hard_reset write_flash -z --flash_mode dio --flash_freq 40m --flash_size detect 0x1000 bootloader.bin 0x8000 partitions.bin 0xe000 boot_app0.bin 0x10000 firmware.bin - You should now see the flashing being done in the command window.
- When it is finished, press the RESET button on the device. It will automatically be set to Accesspoint-mode. The LED will not work (on Pow-U and Pow-P1 the LED will be blue)
- Find the Wi-Fi network AMS2MQTT and connect to it.
- When connected, go to this URL in the browser: http://192.168.4.1
- Initial configuration screens will open.
- Select Board type from the dropdown list, and press Save.
- Connect it to your Wi-Fi network by providing SSID and password (and optionally static IP credentials) - and press Save.
- The device will reboot, the LED is now active.
- Select Yes or No for “Enable one-click upgrade?” (We recommend “Yes”) - and press Save
- The device will now reboot, and you will now be connected to it in the normal way.
- You can now install the device back on the power meter and proceed with configuration as explained here: https://wiki.amsleser.no/en/firmware#configuration-screen